Learn Apache Flume By Gopal Sir
Apache Flume -
Introduction
What is Flume?
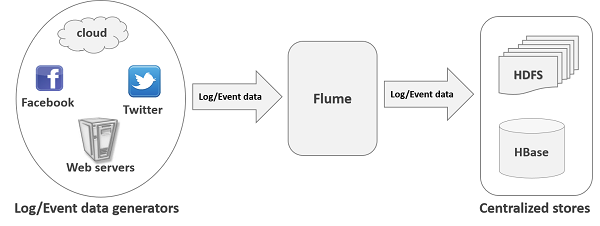
Apache Flume is a tool/service/data ingestion mechanism for
collecting aggregating and transporting large amounts of streaming data such as
log files, events (etc...) from various sources to a centralized data store.
Flume is a highly reliable, distributed, and configurable
tool. It is principally designed to copy streaming data (log data) from various
web servers to HDFS.
Advantages of Flume
Here are the advantages of using Flume −
·
Using Apache Flume we can store the data in to
any of the centralized stores (HBase, HDFS).
·
When the rate of incoming data exceeds the rate
at which data can be written to the destination, Flume acts as a mediator
between data producers and the centralized stores and provides a steady flow of
data between them.
·
Flume provides the feature of contextual
routing.
·
The transactions in Flume are channel-based
where two transactions (one sender and one receiver) are maintained for each
message. It guarantees reliable message delivery.
·
Flume is reliable, fault tolerant, scalable,
manageable, and customizable.
Features of Flume
Some of the notable features of Flume are as follows −
- Flume ingests log data from multiple web servers into a centralized store (HDFS, HBase) efficiently.
- Using Flume, we can get the data from multiple servers immediately into Hadoop.
- Along with the log files, Flume is also used to import huge volumes of event data produced by social networking sites like Facebook and Twitter, and e-commerce websites like Amazon and Flipkart.
- Flume supports a large set of sources and destinations types.
- Flume supports multi-hop flows, fan-in fan-out flows, contextual routing, etc.
- Flume can be scaled horizontally
Apache Flume - Architecture
The following illustration depicts the basic architecture of
Flume. As shown in the illustration, data generators (such as Facebook,
Twitter) generate data which gets collected by individual Flume agents running
on them. Thereafter, a data collector (which is also an agent) collects the
data from the agents which is aggregated and pushed into a centralized store
such as HDFS or Hbase.

Flume Event
An event is the basic unit of the data transported inside
Flume. It contains a payload of byte array that is to be transported from the
source to the destination accompanied by optional headers. A typical Flume
event would have the following structure −

Flume Agent
An agent is an independent daemon process (JVM) in Flume. It
receives the data (events) from clients or other agents and forwards it to its
next destination (sink or agent). Flume may have more than one agent. Following
diagram represents a Flume Agent.As shown in the diagram a
Flume Agent contains three main components namely,
source, channel, and sink.

Source
Apache Flume supports several types of sources and each
source receives events from a specified data generator.
Example − Avro source, Thrift source, twitter 1% source etc.
Channel
A channel is a transient store which receives the events
from the source and buffers them till they are consumed by sinks. It acts as a
bridge between the sources and the sinks.
These channels are fully transactional and they can work
with any number of sources and sinks.
Example − JDBC channel, File system channel, Memory channel,
etc.
Sink
A sink stores the data into centralized stores like HBase
and HDFS. It consumes the data (events) from the channels and delivers it to
the destination. The destination of the sink might be another agent or the
central stores.
Example − HDFS sink
Additional Components of Flume Agent
we have a few more components that play a vital role in
transferring the events from the data generator to the centralized stores.
Interceptors
Interceptors are used to alter/inspect flume events which
are transferred between source and channel.
Channel Selectors
These are used to determine which channel is to be opted to
transfer the data in case of multiple channels. There are two types of channel
selectors −
·
Default channel selectors − These are
also known as replicating channel selectors they replicates all the events in
each channel.
·
Multiplexing channel selectors − These decides
the channel to send an event based on the address in the header of that event.
Sink Processors
These are used to invoke a particular sink from the selected
group of sinks. These are used to create fail-over paths for your sinks or load
balance events across multiple sinks from a channel.
Apache Flume - Data Flow
Flume is a framework which is used to move log data into
HDFS. Generally events and log data are generated by the log servers and these
servers have Flume agents running on them. These agents receive the data from
the data generators.
The data in these agents will be collected by an
intermediate node known as Collector. Just like agents, there can be
multiple collectors in Flume.
Finally, the data from all these collectors will be
aggregated and pushed to a centralized store such as HBase or HDFS. The
following diagram explains the data flow in Flume.

Multi-hop Flow
Within Flume, there can be multiple agents and before
reaching the final destination, an event may travel through more than one
agent. This is known as multi-hop flow.
Fan-out Flow
The dataflow from one source to multiple channels is known
as fan-out flow. It is of two types −
·
Replicating − The data flow where the data will
be replicated in all the configured channels.
·
Multiplexing − The data flow where the data will
be sent to a selected channel which is mentioned in the header of the event.
Fan-in Flow
The data flow in which the data will be transferred from
many sources to one channel is known as fan-in flow.
Failure Handling
In Flume, for each event, two transactions take place: one
at the sender and one at the receiver. The sender sends events to the receiver.
Soon after receiving the data, the receiver commits its own transaction and
sends a “received” signal to the sender. After receiving the signal, the sender
commits its transaction. (Sender will not commit its transaction till it
receives a signal from the receiver.)
Flume - Configuration
After installing Flume, we need to configure it using the
configuration file which is a Java property file having key-value pairs. We
need to pass values to the keys in the file.
In the Flume configuration file, we need to −
·
Name the components of the current agent.
·
Describe/Configure the source.
·
Describe/Configure the sink.
·
Describe/Configure the channel.
·
Bind the source and the sink to the channel.
Naming the Components
First of all, you need to name/list the components such as
sources, sinks, and the channels of the agent, as shown below.
agent_name.sources = source_name
agent_name.sinks = sink_name
agent_name.channels = channel_name
If we are transferring Twitter data using Twitter source
through a memory channel to an HDFS sink, and the agent name id TwitterAgent,
then
TwitterAgent.sources = Twitter
TwitterAgent.channels = MemChannel
TwitterAgent.sinks = HDFS
Describing the Source
Each source will have a separate list of properties. The
property named “type” is common to every source, and it is used to specify the
type of the source we are using.
agent_name.sources. source_name.type = value
agent_name.sources. source_name.property2 = value
agent_name.sources. source_name.property3 = value
if we consider the twitter source, following are the
properties to which we must provide values to configure it.
TwitterAgent.sources.Twitter.type = Twitter (type name)
TwitterAgent.sources.Twitter.consumerKey =
TwitterAgent.sources.Twitter.consumerSecret =
TwitterAgent.sources.Twitter.accessToken =
TwitterAgent.sources.Twitter.accessTokenSecret =
Describing the Sink
Just like the source, each sink will have a separate list of
properties. The property named “type” is common to every sink, and it is used
to specify the type of the sink we are using. Along with the property “type”,
it is needed to provide values to all the required properties of a particular
sink to configure it, as shown below.
agent_name.sinks. sink_name.type = value
agent_name.sinks. sink_name.property2 = value
agent_name.sinks. sink_name.property3 = value
if we consider HDFS sink, following are the properties to
which we must provide values to configure it.
TwitterAgent.sinks.HDFS.type = hdfs (type name)
TwitterAgent.sinks.HDFS.hdfs.path = HDFS directory’s Path to
store the data
Describing the Channel
Flume provides various channels to transfer data between
sources and sinks. Therefore, along with the sources and the channels, it is
needed to describe the channel used in the agent.
To describe each channel, you need to set the required
properties, as shown below.
agent_name.channels.channel_name.type = value
agent_name.channels.channel_name. property2 = value
agent_name.channels.channel_name. property3 = value
For example, if we consider memory channel, following are
the properties to which we must provide values to configure it.
TwitterAgent.channels.MemChannel.type = memory (type name)
Binding the Source and the Sink to the Channel
Since the channels connect the sources and sinks, it is
required to bind both of them to the channel, as shown below.
agent_name.sources.source_name.channels = channel_name
agent_name.sinks.sink_name.channels = channel_name
The following example shows how to bind the sources and the
sinks to a channel. Here, we consider twitter source, memory channel, and HDFS
sink.
TwitterAgent.sources.Twitter.channels = MemChannel
TwitterAgent.sinks.HDFS.channels = MemChannel
Starting a Flume Agent
After configuration, we have to start the Flume agent. It is
done as follows −
$ bin/flume-ng agent --conf ./conf/ -f conf/twitter.conf
Dflume.root.logger=DEBUG,console -n TwitterAgent
where −
agent − Command to start the Flume agent
--conf ,-c<conf> − Use configuration file in the conf
directory
-f<file> − Specifies a config file path, if missing
--name, -n <name> − Name of the twitter agent
-D property =value − Sets a Java system property value.
Example –
Configuration File (twitter.conf in flume conf folder)
TwitterAgent.sources = Twitter
TwitterAgent.channels = MemChannel
TwitterAgent.sinks = HDFS
TwitterAgent.sources.Twitter.type =
com.cloudera.flume.source.TwitterSource
TwitterAgent.sources.Twitter.channels = MemChannel
TwitterAgent.sources.Twitter.consumerKey =
51rg86McareA4pmkHxvAxjtrxtty
TwitterAgent.sources.Twitter.consumerSecret =
xvLhRM2244ENoxLRiFTFPSscTICdQhTHqcQ0G9O5fo5KC1D1aUOPR
TwitterAgent.sources.Twitter.accessToken =
916547003068198913-tK5m3eRgf00Yd4rkkW0cGKu63XVo54MMIY
TwitterAgent.sources.Twitter.accessTokenSecret =
BK75UYkLvuBEWRu5lykOqogcL6twNbMLcjgXad85OamGkTYM
TwitterAgent.sources.Twitter.keywords = modi
TwitterAgent.sinks.HDFS.channel = MemChannel
TwitterAgent.sinks.HDFS.type = hdfs
TwitterAgent.sinks.HDFS.hdfs.path =/flumedir/data/tweets_raw
TwitterAgent.sinks.HDFS.hdfs.fileType = DataStream
TwitterAgent.sinks.HDFS.hdfs.writeFormat = Text
TwitterAgent.sinks.HDFS.hdfs.batchSize = 1000
TwitterAgent.sinks.HDFS.hdfs.rollSize = 0
TwitterAgent.sinks.HDFS.hdfs.rollCount = 10000
TwitterAgent.channels.MemChannel.type = memory
TwitterAgent.channels.MemChannel.capacity = 10000
TwitterAgent.channels.MemChannel.transactionCapacity = 100
Execution
Browse through the Flume home directory and execute the
application as shown below.
$ cd $FLUME_HOME
$ bin/flume-ng agent --conf ./conf/ -f conf/twitter.conf
Dflume.root.logger=DEBUG,console -n TwitterAgent
Flume - NetCat Source
We have to configure the source, the channel, and the sink
using the configuration file in the conf folder. This example uses a NetCat
Source, Memory channel, and a logger sink.
NetCat Source
While configuring the NetCat source, we have to specify a
port while configuring the source. Now the source (NetCat source) listens to
the given port and receives each line we entered in that port as an individual
event and transfers it to the sink through the specified channel.
While configuring this source, you have to provide values to
the following properties −
channels
Source type − netcat
bind − Host name or IP address to bind.
port − Port number to which we want the source to listen.
Channel
We are using the memory channel. To configure the memory
channel, you must provide a value to the type of the channel. Given below are
the list of properties that you need to supply while configuring the memory
channel −
type − It holds the type of the channel. In our example, the type
is MemChannel.
Capacity − It is the maximum number of events stored in the
channel. Its default value is 100. (optional)
TransactionCapacity − It is the maximum number of events the
channel accepts or sends. Its default value is 100. (optional).
Logger Sink
This sink logs all the events passed to it. Generally, it is
used for testing or debugging purpose. To configure this sink, you must provide
the following details.
Channel
type − logger
Example Configuration File
Given below is an example of the configuration file. Copy
this content and save as netcat.conf in the conf folder of Flume.
# Naming the components on the current agent
NetcatAgent.sources = Netcat
NetcatAgent.channels = MemChannel
NetcatAgent.sinks = LoggerSink
# Describing/Configuring the source
NetcatAgent.sources.Netcat.type = netcat
NetcatAgent.sources.Netcat.bind = localhost
NetcatAgent.sources.Netcat.port = 56565
# Describing/Configuring the sink
NetcatAgent.sinks.LoggerSink.type = logger
# Describing/Configuring the channel
NetcatAgent.channels.MemChannel.type = memory
NetcatAgent.channels.MemChannel.capacity = 1000
NetcatAgent.channels.MemChannel.transactionCapacity = 100
# Bind the source and sink to the channel
NetcatAgent.sources.Netcat.channels = MemChannel
NetcatAgent.sinks.LoggerSink.channel = MemChannel
Execution
Browse through the Flume home directory and execute the
application as shown below.
$ cd $FLUME_HOME
$ ./bin/flume-ng agent --conf $FLUME_CONF --conf-file
$FLUME_CONF/netcat.conf
--name NetcatAgent -Dflume.root.logger=INFO,console
If everything goes fine, the source starts listening to the
given port. In this case, it is 56565.
Comments
Post a Comment